Introduction
Are you ready to elevate your dessert game? Strawberry Crunch Cheesecake is the perfect choice that combines the smooth creaminess of classic cheesecake with a delightful crunch and fresh strawberry flavor. Moreover, this dessert not only looks stunning but also offers a perfect balance of textures and tastes. Whether you’re celebrating a special occasion or simply treating yourself, Strawberry Crunch Cheesecake will undoubtedly impress everyone at the table. In this article, we will guide you through every step of making this delicious cheesecake. From gathering the essential ingredients to perfecting each layer, you’ll find all the tips you need. So, let’s dive in and start creating a dessert that’s as beautiful as it is delicious!
Part 1: Introduction to Strawberry Crunch Cheesecake
1.1 What is Strawberry Crunch Cheesecake?
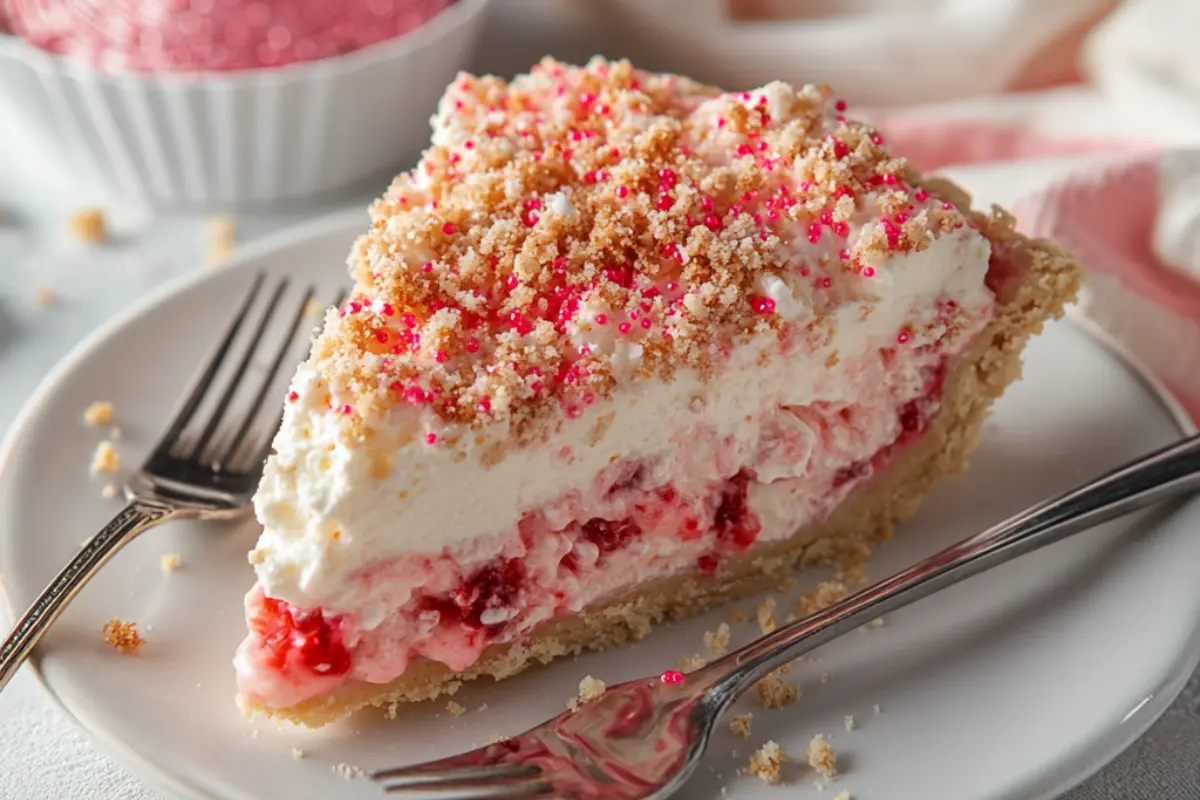
If you’ve ever craved a dessert that perfectly balances creamy indulgence with a satisfying crunch, Strawberry Crunch Cheesecake might just become your new favorite. This delectable treat seamlessly combines the smooth, velvety texture of cheesecake with a sweet, crunchy topping and a burst of strawberry flavor. Imagine this: a classic cheesecake, rich and creamy, layered with vibrant strawberry puree, and topped with a crunchy, sweet layer that adds a delightful contrast. As a result, it’s a dessert that’s not only visually stunning but also offers a mouthwatering blend of textures and flavors.
Furthermore, the Strawberry Crunch Cheesecake is ideal for any occasion, whether it’s a family gathering or a special celebration. The tangy strawberry flavor beautifully complements the richness of the cheesecake, while the crunchy topping provides a satisfying bite. Consequently, it’s a treat that promises to impress both in taste and presentation. Thus, if you love desserts that combine various textures and flavors, this cheesecake is a must-try.
1.2 Brief History of Strawberry Crunch Cheesecake
The concept of cheesecake dates back to ancient Greece, where it was considered a luxurious treat. Over time, it evolved into the modern version we enjoy today, featuring various adaptations and flavors. The Strawberry Crunch Cheesecake is a contemporary twist on the classic, incorporating a unique topping that has gained popularity in recent years.
Additionally, the addition of a crunchy topping and strawberry layer is a relatively recent innovation. This trend reflects a move towards combining traditional dessert elements with exciting new flavors. As a result, the Strawberry Crunch Cheesecake quickly became a hit for its combination of creamy, fruity, and crunchy elements, making it a standout choice for dessert lovers.
1.3 Purpose of the Article
This article aims to be your ultimate guide to making the perfect Strawberry Crunch Cheesecake. We will cover everything from gathering the essential ingredients to mastering each step of the recipe. Moreover, you’ll find tips for achieving the best results and suggestions for variations to suit your preferences. Our goal is to provide you with all the information you need to create a stunning and delicious cheesecake that will delight your friends and family. Whether you’re a baking novice or a seasoned pro, this guide will help you make a cheesecake that’s both beautiful and scrumptious.
Part 2: Ingredients and Tools for Strawberry Crunch Cheesecake
2.1 Essential Ingredients
To create a mouthwatering Strawberry Crunch Cheesecake, you’ll need several key ingredients. Let’s break them down into three main categories: crust, filling, and topping.
Crust Ingredients
- Graham Cracker Crumbs: You’ll need about 1 ½ cups. These crumbs, in particular, form the base of your cheesecake, providing a crunchy foundation.
- Sugar: Just ¼ cup of granulated sugar is enough to sweeten the crust. This amount ensures the crust is not overly sweet.
- Butter: Use 6 tablespoons of melted butter. This ingredient, moreover, helps bind the crumbs together, creating a firm base.
Filling Ingredients
- Cream Cheese: 24 ounces of full-fat cream cheese will make your cheesecake rich and creamy. Be sure to let it soften to room temperature for easier mixing.
- Sugar: 1 cup of granulated sugar adds sweetness to balance the tangy cream cheese. Thus, the sweetness is perfectly complemented.
- Eggs: You’ll need 4 large eggs. They help set the cheesecake and give it a smooth texture.
- Strawberry Puree: 1 cup of strawberry puree adds a fresh, fruity flavor. You can make it by blending fresh or frozen strawberries.
- Vanilla Extract: Just 1 teaspoon of vanilla enhances the overall flavor of the cheesecake. This touch rounds out the taste beautifully.
Topping Ingredients
- Crunchy Topping Mix: This can be made from crushed cereal or cookies mixed with a bit of sugar and melted butter. About 1 cup is needed for a generous layer.
- Fresh Strawberries: Use ½ cup of sliced strawberries to decorate the top. This addition provides a fresh and appealing touch.
2.2 Tools and Equipment Needed
Having the right tools will make your baking experience smoother and more enjoyable. Here’s what you’ll need:
- Mixing Bowls: A few bowls of different sizes will help you mix the crust, filling, and toppings separately.
- Springform Pan: A 9-inch springform pan is ideal. It allows you to easily remove the cheesecake without messing up the sides.
- Electric Mixer: An electric mixer or stand mixer will help you achieve a smooth, lump-free filling.
- Measuring Cups and Spoons: Accurate measurements are crucial for a perfect cheesecake.
- Cooling Rack: A cooling rack allows your cheesecake to cool evenly after baking. Thus, the texture remains consistent.
Part 3: Making the Strawberry Crunch Cheesecake
3.1 Preparing the Crust
Let’s start with the crust.
- Combine Ingredients: In a bowl, mix the graham cracker crumbs, sugar, and melted butter. Stir until everything is evenly combined.
- Press into the Pan: Take the mixture and press it firmly into the bottom of your springform pan. Make sure it’s evenly spread and compacted.
- Bake the Crust: Put the pan in the preheated oven. Bake for about 10 minutes. This step helps the crust set and become crispy. Once done, let it cool while you prepare the filling.
3.2 Making the Cheesecake Filling
Now it’s time for the filling.
- Mix Cream Cheese and Sugar: In a large bowl, beat the softened cream cheese with sugar until smooth. Use an electric mixer for the best results.
- Add Eggs: Crack the eggs into the bowl, one at a time. Beat well after each addition. This method makes the filling creamy and helps it set properly.
- Mix in Strawberry Puree and Vanilla: Add the strawberry puree and vanilla extract to the cream cheese mixture. Stir until well combined.
- Pour Filling into Crust: Pour the cheesecake filling over the cooled crust. Spread it out evenly with a spatula.
3.3 Baking the Cheesecake
Let’s bake your cheesecake.
- Prepare for Baking: Wrap the bottom of the springform pan in aluminum foil. Place it in a large roasting pan. Fill the roasting pan with hot water until it reaches halfway up the sides of the springform pan. This water bath, in particular, helps prevent cracks in the cheesecake.
- Bake: Bake in the oven for about 50-60 minutes. The cheesecake should be set around the edges but still a little wobbly in the center.
- Cool and Chill: Turn off the oven and crack the door open. Let the cheesecake cool in the oven for about an hour. Then, transfer it to the refrigerator. Chill for at least 4 hours or overnight for the best results.
Part 4: Adding the Toppings and Serving
4.1 Preparing the Crunchy Topping
Let’s get the crunchy topping ready.
- Make the Crunchy Mixture: In a bowl, mix crushed cereal or cookies with sugar and melted butter. Stir until combined.
- Add to Cheesecake: After the cheesecake has chilled, sprinkle the crunchy topping evenly over the surface. Press it down gently with a spoon to help it stick.
4.2 Preparing Fresh Strawberries
Fresh strawberries add a nice touch.
- Wash and Slice: Rinse the strawberries under cold water. Pat them dry with a paper towel. Slice them into thin pieces.
- Arrange on Cheesecake: Decorate the top of the cheesecake with the sliced strawberries. Arrange them in a pattern or however you like.
4.3 Drizzling with Strawberry Sauce
A drizzle of strawberry sauce adds extra flavor.
- Prepare Strawberry Sauce: If you have store-bought sauce, it’s ready to use. For homemade, simmer fresh strawberries with a bit of sugar until thickened.
- Drizzle over Cheesecake: Use a spoon or a squeeze bottle to drizzle the sauce over the strawberries and topping.
4.4 Serving Your Cheesecake
Now, it’s time to enjoy your dessert.
- Remove from Pan: Carefully release the springform pan and remove the sides.
- Cut and Serve: Use a sharp knife dipped in hot water to cut the cheesecake into slices. Wipe the knife between cuts for clean slices.
- Store Leftovers: If you have any leftovers, cover them with plastic wrap. Store in the refrigerator for up to 5 days.
Part 5: Delicious Variations and Serving Tips
5.1 Fun Variations to Try
Want to switch things up? Here are some tasty variations of the Strawberry Crunch Cheesecake:
Mini Strawberry Crunch Cheesecakes
- Prepare the Crust: Press a small amount of graham cracker mixture into each cup.
- Make Mini Crusts: Use a muffin tin lined with cupcake liners. Press the mixture firmly into the bottom of each cup.
- Fill and Bake: Spoon the cheesecake filling into the cups. Bake for 15-20 minutes. Cool completely before adding toppings.
- Cool and Add Toppings: Once cooled, add the crunchy topping and fresh strawberries as you would for a regular cheesecake.
No-Bake Strawberry Crunch Cheesecake
- Prepare the Crust: Press the graham cracker mixture into the bottom of your pan, but do not bake it.
- Make the Filling: Mix the cream cheese, sugar, and strawberry puree until smooth.
- Chill: Spread the filling over the crust. Refrigerate for at least 4 hours to set.
- Add Toppings: Top with the crunchy mix and fresh strawberries before serving.
Gluten-Free Strawberry Crunch Cheesecake
- To start, use gluten-free cookies as a substitute for graham crackers in the crust.
- Then, follow the same steps for preparing the crust, filling, and toppings.
- As a result, you’ll end up with a delicious gluten-free cheesecake that everyone can enjoy!
5.2 Serving Tips
Want to make your cheesecake even better? Here are some serving tips:
- Garnish with Mint: Add a few fresh mint leaves for a pop of color and a burst of flavor.
- Serve with Whipped Cream: A dollop of whipped cream can make each slice even more indulgent.
- Use a Sharp Knife: For clean slices, dip your knife in hot water and wipe it between cuts.
- Present on a Beautiful Plate: Serve your cheesecake on a nice plate to impress your guests.
Part 6: Storing and Freezing Your Cheesecake
6.1 Storing the Cheesecake
Want to keep your cheesecake fresh? Here’s how:
- Refrigerate Properly: To keep your cheesecake fresh, cover it with plastic wrap or place it in an airtight container. By doing so, you help preserve its flavor and prevent it from absorbing other smells in the fridge. Additionally, this method maintains the cheesecake’s quality.
- Shelf Life: Your cheesecake will remain good in the refrigerator for up to 5 days. For the best taste, try to enjoy it within the first few days. In general, consuming it sooner rather than later ensures you experience its optimal flavor and texture.
- Avoid Overexposure: To prevent the cheesecake from drying out, don’t leave it uncovered for long. Otherwise, it may lose its moisture and become less enjoyable. Therefore, make sure it is always properly covered when stored.
6.2 Freezing the Cheesecake
Need to store your cheesecake for a longer time? Freezing works well.
- Slice First: Cut the cheesecake into individual slices. This makes it easier to thaw just what you need.
- Wrap Each Slice: Wrap each slice in plastic wrap. Then, wrap it in aluminum foil to prevent freezer burn.
- Store in a Container: Place the wrapped slices in a freezer-safe container or a zip-top bag. This keeps them organized and protected.
- Thawing: To thaw, move the cheesecake to the refrigerator the night before you plan to eat it. Let it defrost slowly.Once you’ve made your Strawberry Crunch Cheesecake, proper storage is key to keeping it fresh and delicious. First, let’s discuss refrigeration. To store your cheesecake, cover it with plastic wrap or place it in an airtight container. This step not only helps prevent it from drying out but also keeps it from absorbing any other smells from your fridge. Moreover, your cheesecake will stay fresh for up to 5 days. For the best taste, try to enjoy it within the first few days.However, if you want to keep your cheesecake for a longer time, freezing is a great option. Begin by slicing the cheesecake into individual pieces. This method makes it easier to thaw only what you need. Next, wrap each slice tightly in plastic wrap, and then in aluminum foil to prevent freezer burn. After that, place the wrapped slices in a freezer-safe container or a zip-top bag. When you’re ready to enjoy, simply transfer the cheesecake to the refrigerator the night before. Let it thaw slowly for the best results.
By following these storage tips, you can ensure that your Strawberry Crunch Cheesecake remains as delightful as the day you made it.
Part 7: Storing and Freezing Your Cheesecake
Once you’ve made your Strawberry Crunch Cheesecake, proper storage is essential for maintaining its freshness. To begin with, let’s discuss refrigeration. To store your cheesecake, make sure to cover it with plastic wrap or place it in an airtight container. This step is crucial as it helps prevent the cheesecake from drying out and absorbing any other odors from your fridge. Consequently, your cheesecake will stay fresh for up to 5 days. To ensure the best taste, it’s advisable to enjoy it within the first few days.
However, if you wish to keep your cheesecake for a longer period, freezing is a viable option. Start by slicing the cheesecake into individual pieces, which makes it more convenient to thaw only what you need. Then, wrap each slice tightly in plastic wrap and follow with aluminum foil to prevent freezer burn. After wrapping, place the slices in a freezer-safe container or a zip-top bag. When you’re ready to enjoy a slice, simply transfer it to the refrigerator the night before. Let it thaw slowly to achieve the best texture and flavor.
By following these storage tips, you can ensure that your Strawberry Crunch Cheesecake remains as delicious as it was on the day you made it. Thus, whether you’re saving some for later or sharing it with friends, you’ll always have a tasty treat ready to enjoy.
Part 8: Frequently Asked Questions
7.1 Can I Freeze Strawberry Crunch Cheesecake?
Yes, you can freeze it.
- Slice and Wrap: Cut the cheesecake into slices. Wrap each slice in plastic wrap, then in aluminum foil.
- Store in Freezer: Place the wrapped slices in a freezer-safe container or bag.
- Thaw Before Eating: Move the cheesecake to the fridge the night before you want to eat it. Let it thaw overnight.
7.2 How Long Does Strawberry Crunch Cheesecake Last?
In the refrigerator, it lasts about 5 days.
- Store Properly: Keep it covered with plastic wrap or in an airtight container.
- Best Within Days: For the best taste, try to eat it within a few days.
7.3 Why Is My Cheesecake Cracking?
Cracks can happen for a few reasons.
- Too Much Heat: If the oven is too hot, it can cause cracks in your cheesecake. Therefore, make sure to use a water bath to regulate the temperature and prevent such issues.
- Cooling Too Fast: On the other hand, if the cheesecake cools too quickly, it might also develop cracks. Consequently, let the cheesecake cool slowly in the oven with the door slightly open. By doing this, you allow it to cool gradually and evenly, reducing the risk of cracking.
7.4 Can I Substitute Ingredients?
Yes, you can make some swaps to fit your dietary needs or preferences.
- For instance, if you need a gluten-free option, use gluten-free cookies for the crust.
- Alternatively, if you are looking for a dairy-free version, try using dairy-free cream cheese instead.
- Moreover, if you want to experiment with different flavors, consider swapping strawberries with other fruits such as blueberries or raspberries.
Conclusion
Congratulations! You’ve now mastered the art of making Strawberry Crunch Cheesecake. This dessert is a true delight, with its creamy filling and crunchy topping. Whether you stick to the classic recipe or try one of the variations, you’re in for a treat.
Remember these key tips:
- Prep the Crust: Make sure to bake it until it’s just right.
- Chill Properly: Let the cheesecake cool completely before adding toppings.
- Serve Beautifully: Garnish with fresh strawberries and a drizzle of sauce.
Enjoy your cheesecake with friends and family. It’s a great way to make any gathering special. And if you have leftovers, store them properly to enjoy later.
Happy baking, and here’s to your delicious Strawberry Crunch Cheesecake!